Add Algolia to your Hugo site
Overview
In this guide, you will learn how to add a customizable search experience to your Hugo site using open source tools from Algolia.
This guide will show you how to do the following:
- Generate a search index using Hugo’s Custom output formats.
- Send your search index to Algolia using the atomic-algolia npm package.
- Display search results on your site using the free UI components available in the Algolia Autocomplete JavaScript libraries.
Prerequisites
Before you begin, you’ll need to have the following:
- A Hugo site
- An Algolia account and an application with the following details:
- Application ID
- Admin API key
- Search-only API key
Generate your search index
In order to use Algolia, you must first create an index of your content in JSON or CSV format. In this tutorial we will create a JSON file using Hugo’s Custom output formats. After you have configured Hugo to generate the index, you’ll learn how to send this file to Algolia.
In your hugo.yml file, add the following to the outputs section:
# Algolia configuration

outputFormats:
  Algolia:
    baseName: algolia
    isPlainText: true
    mediaType: application/json
    notAlternative: true
params:
  algolia:
    vars:
      - title
      - summary
      - date
      - publishdate
      - expirydate
      - permalink
    params:
      - categories
      - tags
Now that you have added the Algolia output format, you can specify the structure of your search index using a JSON template.
Build your JSON template
In your site’s layouts directory, you will now build a Go template that generates the JSON file that you will send to Algolia. Depending on how your site is structured, you can edit the variables to expose attributes of your content that you want to index.
The following code is a good starting point for a basic Hugo documentation site. This template will do the following:
- Create a JSON object for each page that is not a draft, and that does not have the
hideorhideSearchparameters set totrue. - Add the following attributes to each JSON object:
titleslugkeywordspathdateweightsectionWeightsectionlayouttagscategories
- Add the
sectionsattribute to each JSON object, which is an array of the page’s parent sections. - Add each JSON object to the
indexobject, which is a map of the page’s permalink to the JSON object.
Add the following code to layouts/_default/algolia.json:
{{- /* Generates a valid Algolia search index */ -}}
{{- define "algolia-section-array" -}}
  {{- if and (not .parent.IsHome) .parent.Title -}}
    {{- if .parent.Parent -}}
      {{- template "algolia-section-array" (dict "scratch" .scratch "parent" .parent.Parent) -}}
    {{- end -}}
    {{- .scratch.Add "sections" .parent.Title -}}
  {{- end -}}
{{- end -}}

{{- $.Scratch.Set "index" dict -}}
{{- range .Site.RegularPages -}}
  {{- if and (not .Draft) (not .Params.hide) (not .Params.hideSearch) (not .IsHome) .IsPage -}}
    {{- $.Scratch.Set "record" dict -}}
    {{- if .Parent -}}
      {{- $.Scratch.Set "sections" slice -}}
      {{- template "algolia-section-array" (dict "scratch" $.Scratch "parent" .Parent) -}}
      {{- $.Scratch.SetInMap "record" "sections" ($.Scratch.Get "sections") -}}
    {{- end -}}
    {{- $.Scratch.SetInMap "record" "title" .Title -}}
    {{- $.Scratch.SetInMap "record" "slug" (path.Base .RelPermalink) -}}
    {{- $.Scratch.SetInMap "record" "keywords" .Keywords -}}
    {{- $.Scratch.SetInMap "record" "path" .RelPermalink -}}
    {{- $.Scratch.SetInMap "record" "date" .PublishDate -}}
    {{- $.Scratch.SetInMap "record" "weight" .Weight -}}
    {{- $.Scratch.SetInMap "record" "sectionWeight" (.Site.GetPage "section" .Section).Weight -}}
    {{- $.Scratch.SetInMap "record" "section" (.Site.GetPage "section" .Section).Title -}}
    {{- $.Scratch.SetInMap "record" "layout" .Layout -}}
    {{- $.Scratch.SetInMap "record" "tags" .Params.Tags -}}
    {{- $.Scratch.SetInMap "record" "categories" .Params.Categories -}}
    {{- $.Scratch.SetInMap "index" .RelPermalink ($.Scratch.Get "record") -}}
  {{- end -}}
{{- end -}}
{{- $.Scratch.Get "index" | jsonify -}}
Now you are ready to generate your algolia.json search index.
Create a custom output format for Algolia
In hugo.yml, add the following:
outputs:
  home:
    - HTML
    - RSS
    - Algolia
By adding these output formats, when you build your production site with the hugo command, you will see a new algolia.json file in your public directory. You are ready to configure Algolia and send your search index to the service.
Configure Algolia
Head over to your Algolia dashboard and if you haven’t already, create a new application and an index.
Once you have created your application, retrive your app ID, index name and admin API key. Create an .env file in the root of your Hugo site and add the following variables:
ALGOLIA_APP_ID=<your_app_id>
ALGOLIA_ADMIN_KEY=<your_admin_key>
ALGOLIA_INDEX_NAME=<your_index_name>
ALGOLIA_INDEX_FILE=public/algolia.json
Replace the values with your own. If you have followed this guide so far, your algolia.json file will be in the public directory of your Hugo site. Change the path if you have a different setup.
Send your search index to Algolia
Now that you have your Algolia credentials, you can send your search index to Algolia. To do this, you will use the atomic-algolia npm package.
Install Atomic Algolia:
npm install atomic-algolia
Once installed and configured, Atomic Algolia will keep track of your search index and automatically update it when you make changes to your Hugo site. Atomic Algolia will only submit changes to your search index, so you don’t have to worry about sending the entire index every time you make a change, which can cut down on costs.
Once installed, add a new script to your package.json file:
{
  "scripts": {
    "algolia": "atomic-algolia"
  }
}
Now, you can run the following command at build/publish time to update your search index with changes to your content:
npm run algolia
You should now be able to see your search index in your Algolia dashboard.
Display search results on your site
Now that you have sent your search index to Algolia, the index is available to communicate with your front end and your users. To achieve this, use the Algolia Autocomplete JavaScript library.
Autocomplete is a great way to quickly enable a search experience using ready-made JavaScript components. To get a feel for how it works, try the search feature on this site, either by clicking into the search box in the top right corner, or by pressing the ⌘ K shortcut.
Install Autocomplete
Begin by installing the Autocomplete JavaScript library:
yarn add @algolia/autocomplete-js
# or
npm install @algolia/autocomplete-js
Add the Autocomplete CSS
Add the Autocomplete CSS to your project. You can either import it in your JavaScript file:
import '@algolia/autocomplete-theme-classic';
or add it in your HTML:
<link
  rel="stylesheet"
  href="https://cdn.jsdelivr.net/npm/@algolia/autocomplete-theme-classic"
/>
This guide shows some of the basic steps for setting up Autocomplete, with examples on how to customize the search experience for a Hugo site. For more detailed documentation on the autocomplete library, see the Autocomplete installation documentation.
Display search results
Now that you have installed the Autocomplete library, you can initialize the search client and display search results on your site. In this example, we will use a ready-made example from the Autocomplete documentation. Once you have it working, you can replace the example with your own App ID, index name and API key.
- Create a container with an id
#autocompletewhere you want to display your search results.
<div id="autocomplete"></div>
Add this container to the relevant layout in your Hugo site, such as the
layouts/_default/baseof.htmlfile.Create a new file in your Hugo site’s
assets/jsdirectory, or wherever you keep your compiled JavaScript files, and name itsearch.js,algolia.jsor similar. Import it in your project:
import algoliasearch from 'algoliasearch/lite';
import { autocomplete, getAlgoliaResults } from '@algolia/autocomplete-js';

const searchClient = algoliasearch(
  'latency',
  '6be0576ff61c053d5f9a3225e2a90f76'
);

const autocompleteSearch = autocomplete({
  container: '#autocomplete',
  getSources() {
    return [
      {
        sourceId: 'querySuggestions',
        getItemInputValue: ({ item }) => item.query,
        getItems({ query }) {
          return getAlgoliaResults({
            searchClient,
            queries: [
              {
                indexName: 'instant_search_demo_query_suggestions',
                query,
                params: {
                  hitsPerPage: 4,
                },
              },
            ],
          });
        },
        templates: {
          item({ item, components }) {
            return components.ReverseHighlight({ hit: item, attribute: 'query' });
          },
        },
      },
    ];
  },
});
Now that you have a working index of your site’s content in Algolia, and you have initialized the search client, you can display search results on your site.
Workflow diagram
This diagram shows the workflow for the steps in this guide.
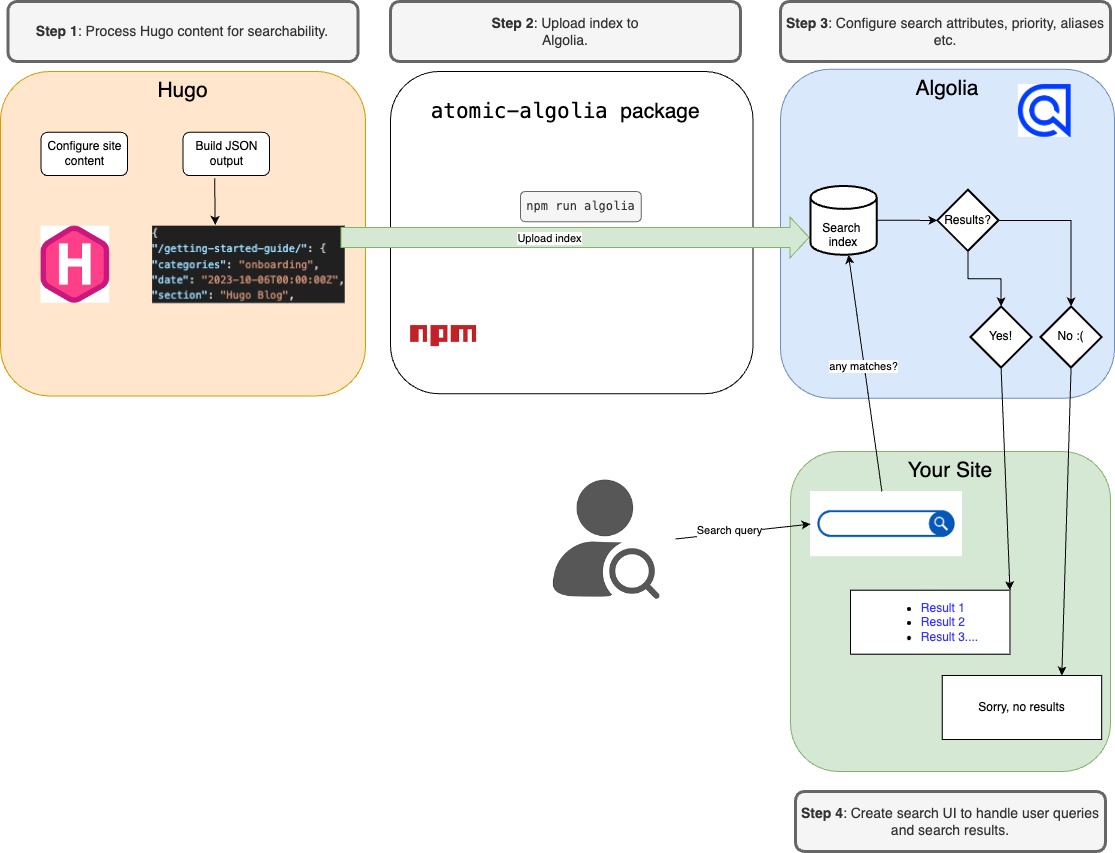
Hugo content to Algolia index workflow
Feedback
Was this page helpful?
Glad to hear it! Please tell us how we can improve.
Sorry to hear that. Please tell us how we can improve.